ESP8266-WROOM-02 Proxy経由でWEBページを取得

ESP8266HTTPClientを使ってあげれば
httpであればProxy経由で取得するのは簡単でした。
httpsは一筋縄ではいかなそう(?)勉強中です。

単純なサンプルを載せておきます。

/*
 * 単純にProxy経由でWEBページを取得するサンプル
 */

#include <ESP8266WiFi.h>
#include <ESP8266HTTPClient.h>

void setup() {
  Serial.begin(115200);
  Serial.println();

  WiFi.mode(WIFI_STA);
  WiFi.begin("SSID", "PASSWORD");

  while (WiFi.status() != WL_CONNECTED) {
    delay(500);
    Serial.print(".");
  }

  Serial.println();
  Serial.println("WiFi connected");  
  Serial.print("IP address: ");
  Serial.println(WiFi.localIP());
}

void loop() {
    // wait for WiFi connection
    if((WiFi.status() == WL_CONNECTED)) {

        HTTPClient http;

        Serial.print("[HTTP] begin...\n");

        //Proxyサーバを使う場合
        http.begin("Proxy.server.ip",8080,"http://www.dmsk.com/pc/main-hw.html");

        //Proxyサーバを使わない場合
        //http.begin("http://www.dmsk.com/pc/main-hw.html");
        
        Serial.print("[HTTP] GET...\n");
        // start connection and send HTTP header
        int httpCode = http.GET();

        // httpCode will be negative on error
        if(httpCode > 0) {
            // HTTP header has been send and Server response header has been handled
            Serial.printf("[HTTP] GET... code: %d\n", httpCode);

            // file found at server
            if(httpCode == HTTP_CODE_OK) {
                String payload = http.getString();
                Serial.println(payload);
            }
        } else {
            Serial.printf("[HTTP] GET... failed, error: %s\n", http.errorToString(httpCode).c_str());
        }

        http.end();
    }

    delay(20000);
}

解説というほどのこともないですが、
35行目で、Proxyサーバのアドレス、ポート、開きたいページのURLを指定するだけです。

Yahoo天気予報をESP8266-WROOM-02やESP–32などのマイコンから参照しやすくしてみる

Yahoo天気予報をESP8266-WROOM-02やESP–32などのマイコンから参照しやすくしてみる

天気予報はYahooやLivedoorが無料でRSSを提供してくれています。他にもgooとかもやってみたいです。今回はYahoo!の天気予報をマイコンで表示したりするのに利用しやすくするためにごにょごにょしたことをまとめておきたいと思います。

まず、Yahooの天気予報のRSSは、次のページで各地域ごとにxml形式で提供されています。
https://weather.yahoo.co.jp/weather/rss/
実際に開いてみるとわかりますが、更新日時とか、警報や注意報など天気以外の表示するのに必要なさそうな情報も沢山入っています。この大量の文字列からパターンマッチをして必要な文字列を切り出して来なければなりません。なんて考えていたらマイコンでこの処理をさせるのは大変だーと思ってきました。さらに、Yahooの天気予報はhttpsなのでセキュア通信もさせなくてはなりません…。うーん、httpsだとプロキシ経由だったりするとページを取得するだけでも難しそうだな、、、などなど色々考えた結果。扱いやすいデータに変換してからマイコンで受信したほうが簡単じゃないか(?)というとこに至ったのでした。

前置きが長くなりましたが、今回やってみるのは、PHPを使ってマイコンで使いやすい天気予報データに変換しちゃおう♪というのが狙いです。

概要:
・Yahooの天気予報のRSSを利用
・WEBサーバ上で動くPHPプログラムを作成してみる
(PHPにした理由はPHPだと簡単だから)

■getytenki.phpのプログラム

<?php
header('Content-type: application/xml; charset=UTF-8');
date_default_timezone_set('Asia/Tokyo');

//リクエストURLから数字文字列を取得
$placeNo = htmlspecialchars($_GET["p"]);

//Yahoo天気のxmlファイルのURL
$xmlurl = "https://rss-weather.yahoo.co.jp/rss/days/" . $placeNo . ".xml";

//xml読み込む
$lines = file($xmlurl);


echo "<?xml version=\"1.0\" encoding=\"UTF-8\"?>\n";
echo "<root>\n";
echo "<sourceurl>" . $xmlurl . "</sourceurl>\n";
echo "<dataprovider>Yahoo!天気・災害</dataprovider>\n";

foreach ($lines as $line_num => $line) {

  //copyright表示
  if(preg_match('/<copyright(.+)copyright>/',$line,$matches)){
    echo $matches[0] . "\n";
    echo "<today>" . date('Y年m月d日') . "</today>\n";
  }

  //<title>タグの情報を読み込む
  if(preg_match_all('/<title>(.+?)<\/title>/',$line,$matches)){
    //print_r($matches);

    //場所の文字列を抜き出す
    if(preg_match('/災害 - (.+)の天気/',$matches[1][0],$place)){
      echo "<place>" . mb_convert_kana($place[1],'a','UTF-8') . "</place>\n"; //全角→半角にもしておく
    }

    //天気情報を抜き出す
    foreach ($matches[1] as $mt_num => $mt) {
      if(preg_match_all('/【 (.+日.+?)).+ 】 (.+) - (.+) - /',$mt,$dt)){
        //print_r($dt);
        echo "<item>";
        echo mb_convert_kana($dt[1][0],'a','UTF-8') . ":" . $dt[2][0] . ":" . $dt[3][0];
        echo "</item>\n";
      }
    }
  }
}
echo "</root>\n";


プログラムはたったこれだけです。
上記プログラムをPHPが動くWEBサーバに置いてアクセスしてみます。ゆくゆくはマイコンでアクセスさせますが、まずはパソコンで確認です。
http://bmicom.dmsk.com/php/getytenki.php?p=4820
URLのおしりの数字は、Yahooの天気予報のxmlファイル名の数字です。ブラウザによっては文字が羅列されているかもしれませんが、ソースを見てもらうとxml形式になっているのがわかります。
今回は4820なので長野県松本の天気情報が取得できました。


出力されるxmlの文字コードはUTF-8になっています。

もしかしたらフォントの関係とかでShift-JISで受信したい場合もあるかもしれません。そんなときは以下のようにして、PHP側でShift-JISにしてしまうのも手かと思います。

■getytenkisj.phpのプログラム

<?php
header('Content-type: application/xml; charset=Shift_JIS');
date_default_timezone_set('Asia/Tokyo');


//リクエストURLから数字文字列を取得
$placeNo = htmlspecialchars($_GET["p"]);

//Yahoo天気のxmlファイルのURL
$xmlurl = "https://rss-weather.yahoo.co.jp/rss/days/" . $placeNo . ".xml";

//xml読み込む
$lines = file($xmlurl);


echo mb_convert_encoding("<?xml version=\"1.0\" encoding=\"Shift-JIS\"?>\n", "SJIS", "UTF-8");
echo mb_convert_encoding("<root>\n", "SJIS", "UTF-8");
echo mb_convert_encoding("<sourceurl>" . $xmlurl . "</sourceurl>\n", "SJIS", "UTF-8");
echo mb_convert_encoding("<dataprovider>Yahoo!天気・災害</dataprovider>\n", "SJIS", "UTF-8");

foreach ($lines as $line_num => $line) {

  //copyright表示
  if(preg_match('/<copyright(.+)copyright>/',$line,$matches)){
    echo mb_convert_encoding($matches[0] . "\n", "SJIS", "UTF-8");
    echo mb_convert_encoding("<today>" . date('Y年m月d日') . "</today>\n", "SJIS", "UTF-8");
  }

  //<title>タグの情報を読み込む
  if(preg_match_all('/<title>(.+?)<\/title>/',$line,$matches)){
    //print_r($matches);

    //場所の文字列を抜き出す
    if(preg_match('/災害 - (.+)の天気/',$matches[1][0],$place)){
      echo mb_convert_encoding("<place>" . mb_convert_kana($place[1],'a','UTF-8') . "</place>\n", "SJIS", "UTF-8"); //全角→半角にもしておく
    }

    //天気情報を抜き出す
    foreach ($matches[1] as $mt_num => $mt) {
      if(preg_match_all('/【 (.+日.+?)).+ 】 (.+) - (.+) - /',$mt,$dt)){
        //print_r($dt);
        echo mb_convert_encoding("<item>", "SJIS", "UTF-8");
        echo mb_convert_encoding(mb_convert_kana($dt[1][0],'a','UTF-8') . ":" . $dt[2][0] . ":" . $dt[3][0], "SJIS", "UTF-8");
        echo mb_convert_encoding("</item>\n", "SJIS", "UTF-8");
      }
    }
  }
}
echo "</root>\n";

ESP-WROOM-02 TCPソケット通信

ESP-WROOM-02を2個使って片方がサーバ、もう片方がクライアントとして接続し、TCPソケット通信をしてみます。
UDPのサンプルは良く見るけど、TCPのソケット通信はなかなか見つからなかったので実験をかねて作成してみました。
クライアント側を電池で動かせばリモコンとして使えそうです。


概要:
・Arduinoの開発環境でプログラミングしてESP-WROOM-02に書込む
・サーバ側はSoftAPモードでWiFiアクセスポイントを開設
・クライアント側はSWを押すとコマンドをサーバに送る
・サーバ側は送られて来たコマンドを見てLEDをON/OFFする


動作イメージ

クライアント側のSWを押すとサーバ側のLEDが光ります


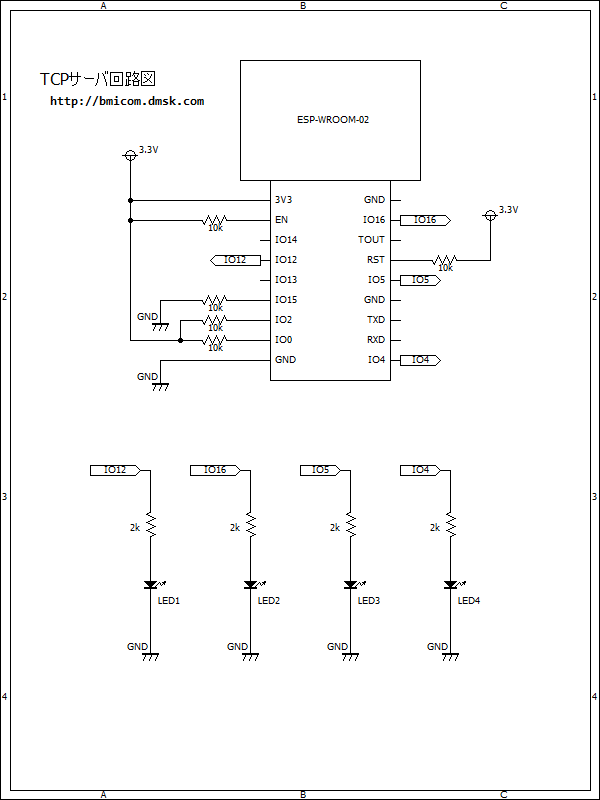
サーバ側回路図とプログラム


//サーバ側プログラム
#include <ESP8266WiFi.h>

static const char *SSID = "WROOM-B'MICOM";
static const char *PASSWD = "password";

const int LED1 = 12; //SW1のIOピン
const int LED2 = 16; //SW2のIOピン
const int LED3 = 5;  //SW3のIOピン
const int LED4 = 4;  //SW4のIOピン

IPAddress ip(192, 168, 0, 33);
//IPAddress gateway(192, 168, 0, 1);
//IPAddress netmask(255, 255, 255, 0);

WiFiServer server(26842);  //Port番号

void setup() {
  Serial.begin(115200);
  Serial.println();

  pinMode(LED1, OUTPUT);
  pinMode(LED2, OUTPUT);
  pinMode(LED3, OUTPUT);
  pinMode(LED4, OUTPUT);

  //起動時LEDを光らせてみる
  digitalWrite(LED1, HIGH);
  delay(100);
  digitalWrite(LED1, LOW);
  digitalWrite(LED2, HIGH);
  delay(100);
  digitalWrite(LED2, LOW);
  digitalWrite(LED3, HIGH);
  delay(100);
  digitalWrite(LED3, LOW);
  digitalWrite(LED4, HIGH);
  delay(100);
  digitalWrite(LED4, LOW);

  //WiFiアクセスポイントを開始
  WiFi.mode(WIFI_AP);
  WiFi.softAP(SSID, PASSWD);
  WiFi.softAPConfig(ip, WiFi.gatewayIP(), WiFi.subnetMask());
  //WiFi.softAPConfig(ip, gateway, netmask);
  WiFi.begin();

  IPAddress myIP = WiFi.softAPIP();
  Serial.print("AP Started. myIP address: ");
  Serial.println(myIP);

  //Portのlistenを開始
  server.begin();
  Serial.println("Server started");

}

void loop() {
  String cmd;
  cmd = rcvCommand();

  //受信したコマンドに対応したLEDを点灯/消灯
  if(cmd == "LED1OFF"){
    Serial.print("Exec: ");
    Serial.println(cmd);
    digitalWrite(LED1, LOW);
  }
  if(cmd == "LED1ON"){
    Serial.print("Exec: ");
    Serial.println(cmd);
    digitalWrite(LED1, HIGH);
  }
  if(cmd == "LED2OFF"){
    Serial.print("Exec: ");
    Serial.println(cmd);
    digitalWrite(LED2, LOW);
  }
  if(cmd == "LED2ON"){
    Serial.print("Exec: ");
    Serial.println(cmd);
    digitalWrite(LED2, HIGH);
  }
  if(cmd == "LED3OFF"){
    Serial.print("Exec: ");
    Serial.println(cmd);
    digitalWrite(LED3, LOW);
  }
  if(cmd == "LED3ON"){
    Serial.print("Exec: ");
    Serial.println(cmd);
    digitalWrite(LED3, HIGH);
  }
  if(cmd == "LED4OFF"){
    Serial.print("Exec: ");
    Serial.println(cmd);
    digitalWrite(LED4, LOW);
  }
  if(cmd == "LED4ON"){
    Serial.print("Exec: ");
    Serial.println(cmd);
    digitalWrite(LED4, HIGH);
  }
}

//コマンドを受信してそのコマンド文字列を返す
String rcvCommand(){
  WiFiClient client = server.available();
  String rstr;
  if (client.connected()) {
    Serial.println("Connected to client");

    //コマンド文字列受信(文字列が来なければタイムアウトする)
    rstr = client.readStringUntil('\r');
    Serial.print("[");
    Serial.print(rstr);
    Serial.println("]");

    //応答送信
    client.print("OK\r");

    //接続をクローズ
    client.stop();
    Serial.println("Closed");
  }

  return rstr;
}


クライアント側回路図とプログラム


//クライアント側プログラム
#include <ESP8266WiFi.h>
#include <Ticker.h>

#define SW_ONDELAY  4000  //SWチャタリング防止ディレイ(ループカウント数)
#define SW_OFFDELAY 4000  //SWチャタリング防止ディレイ(ループカウント数)

Ticker ticker1;  //タイマ割り込み (LED点滅用)

const char* ssid = "WROOM-B'MICOM";
const char* password = "password";

char hostIP[] = "192.168.0.33";
int  hostPort = 26842;

const int SW1 = 12; //SW1のIOピン
const int SW2 = 16; //SW2のIOピン
const int SW3 = 5;  //SW3のIOピン
const int SW4 = 4;  //SW4のIOピン
const int LED = 13; //LEDのIOピン

int ledStatus = 0; //0:消灯 1:点灯 2:点滅 
int sw1Status = 0; //0:OFF 1:ON
int sw2Status = 0; //0:OFF 1:ON
int sw3Status = 0; //0:OFF 1:ON
int sw4Status = 0; //0:OFF 1:ON

WiFiClient client;

void setup() {
  Serial.begin(115200);

  //タイマ割り込み間隔と 割り込み関数名 LEDの点滅に使用
  ticker1.attach_ms(500, ticker1_interrupt);

  pinMode(SW1, INPUT);
  pinMode(SW2, INPUT);
  pinMode(SW3, INPUT);
  pinMode(SW4, INPUT);
  pinMode(LED, OUTPUT);
    
  Serial.println("Booting...");
  WiFi.mode(WIFI_STA);

  connectToWiFi();
  
}

void connectToWiFi(){
    ledStatus = 2;//0:消灯 1:点灯 2:点滅 
    
    WiFi.begin(ssid, password);
    delay(500);

    int retrycnt = 0;
    while(WiFi.waitForConnectResult() != WL_CONNECTED){
      Serial.print(".");
      delay(100);
      retrycnt++;
      if(retrycnt > 100){
        ESP.restart();
      }
    }
    Serial.println("Connect Success");
}


void loop() {

  if (WiFi.status() == WL_CONNECTED) {
    ledStatus = 1;//0:消灯 1:点灯 2:点滅 

    sw1process();
    sw2process();
    sw3process();
    sw4process();
    
  }else{
    //WiFi接続が切れた
    Serial.println("WiFi ERR. Restart.");
    ESP.restart();
  }
}

void sendSocket(String str)
{
  if (client.connect(hostIP, hostPort))
  { 
    Serial.print("Connected:");
    Serial.println(hostIP);
    Serial.println("Posting: " + str);

    //送信
    client.print(str);
 
    //応答受信
    client.setTimeout(1000);
    do{
      String line = client.readStringUntil('\r');
      Serial.print(line);
    } while (client.available() != 0);  //残りがあるときはさらに受信のためループ
    Serial.println();
  }
  else
  {
     Serial.println("Connection failed.");
  }
}

//SW1の処理
int sw1onCnt = 0;
int sw1offCnt = 0;
void sw1process(){
  if(sw1Status == 0){
    if(digitalRead(SW1) == HIGH){
      sw1onCnt++;
      if(sw1onCnt == SW_ONDELAY){
        //ON送信
        sendSocket("LED1ON\r");;
        sw1Status = 1;
        sw1offCnt = 0;
      }else if(sw1onCnt > SW_ONDELAY){
        sw1onCnt = SW_ONDELAY;
      }
    }else{
      sw1onCnt = 0;
    }    
  }else{
    if(digitalRead(SW1) == LOW){
      sw1offCnt++;
      if(sw1offCnt == SW_OFFDELAY){
        //OFF送信
        sendSocket("LED1OFF\r");
        sw1Status = 0;
        sw1onCnt = 0;
      }else if(sw1offCnt > SW_OFFDELAY){
        sw1offCnt = SW_OFFDELAY;
      }
    }else{
      sw1offCnt = 0;
    } 
  }
}

//SW2の処理
int sw2onCnt = 0;
int sw2offCnt = 0;
void sw2process(){
  if(sw2Status == 0){
    if(digitalRead(SW2) == HIGH){
      sw2onCnt++;
      if(sw2onCnt == SW_ONDELAY){
        //ON送信
        sendSocket("LED2ON\r");;
        sw2Status = 1;
        sw2offCnt = 0;
      }else if(sw2onCnt > SW_ONDELAY){
        sw2onCnt = SW_ONDELAY;
      }
    }else{
      sw2onCnt = 0;
    }    
  }else{
    if(digitalRead(SW2) == LOW){
      sw2offCnt++;
      if(sw2offCnt == SW_OFFDELAY){
        //OFF送信
        sendSocket("LED2OFF\r");
        sw2Status = 0;
        sw2onCnt = 0;
      }else if(sw2offCnt > SW_OFFDELAY){
        sw2offCnt = SW_OFFDELAY;
      }
    }else{
      sw2offCnt = 0;
    } 
  }
}

//SW3の処理
int sw3onCnt = 0;
int sw3offCnt = 0;
void sw3process(){
  if(sw3Status == 0){
    if(digitalRead(SW3) == HIGH){
      sw3onCnt++;
      if(sw3onCnt == SW_ONDELAY){
        //ON送信
        sendSocket("LED3ON\r");;
        sw3Status = 1;
        sw3offCnt = 0;
      }else if(sw3onCnt > SW_ONDELAY){
        sw3onCnt = SW_ONDELAY;
      }
    }else{
      sw3onCnt = 0;
    }    
  }else{
    if(digitalRead(SW3) == LOW){
      sw3offCnt++;
      if(sw3offCnt == SW_OFFDELAY){
        //OFF送信
        sendSocket("LED3OFF\r");
        sw3Status = 0;
        sw3onCnt = 0;
      }else if(sw3offCnt > SW_OFFDELAY){
        sw3offCnt = SW_OFFDELAY;
      }
    }else{
      sw3offCnt = 0;
    } 
  }
}

//SW4の処理
int sw4onCnt = 0;
int sw4offCnt = 0;
void sw4process(){
  if(sw4Status == 0){
    if(digitalRead(SW4) == HIGH){
      sw4onCnt++;
      if(sw4onCnt == SW_ONDELAY){
        //ON送信
        sendSocket("LED4ON\r");;
        sw4Status = 1;
        sw4offCnt = 0;
      }else if(sw4onCnt > SW_ONDELAY){
        sw4onCnt = SW_ONDELAY;
      }
    }else{
      sw4onCnt = 0;
    }    
  }else{
    if(digitalRead(SW4) == LOW){
      sw4offCnt++;
      if(sw4offCnt == SW_OFFDELAY){
        //OFF送信
        sendSocket("LED4OFF\r");
        sw4Status = 0;
        sw4onCnt = 0;
      }else if(sw4offCnt > SW_OFFDELAY){
        sw4offCnt = SW_OFFDELAY;
      }
    }else{
      sw4offCnt = 0;
    } 
  }
}


//タイマ割り込み時の処理
void ticker1_interrupt(){
  if(ledStatus == 0){
    digitalWrite(LED, LOW);
  }else if(ledStatus == 1){
    digitalWrite(LED, HIGH);
  }else if(ledStatus == 2){
    digitalWrite(LED, !digitalRead(LED));
  }
}